Building an AI Chat App with .NET, Azure OpenAI and Vue.js - Part 2
We continue the tutorial in this second part. We'll deploy all the Azure resources and integrate them with the backend API.

In this article
Introduction
In the first part of this tutorial (opens in a new window), we set up the project, created the backend API and ran it inside a Docker container. Now, we’ll take care of the required Azure resources and integrate them with the previously created backend API. You will see that within a few steps, we can have a fully functional AI chat application. It’s easier than you might think!
Looking at the architecture of the application, we can see that the backend API will call the Azure OpenAI resource to get responses to the user’s messages. The Azure OpenAI resource will use a deployed model to generate the responses.
Azure
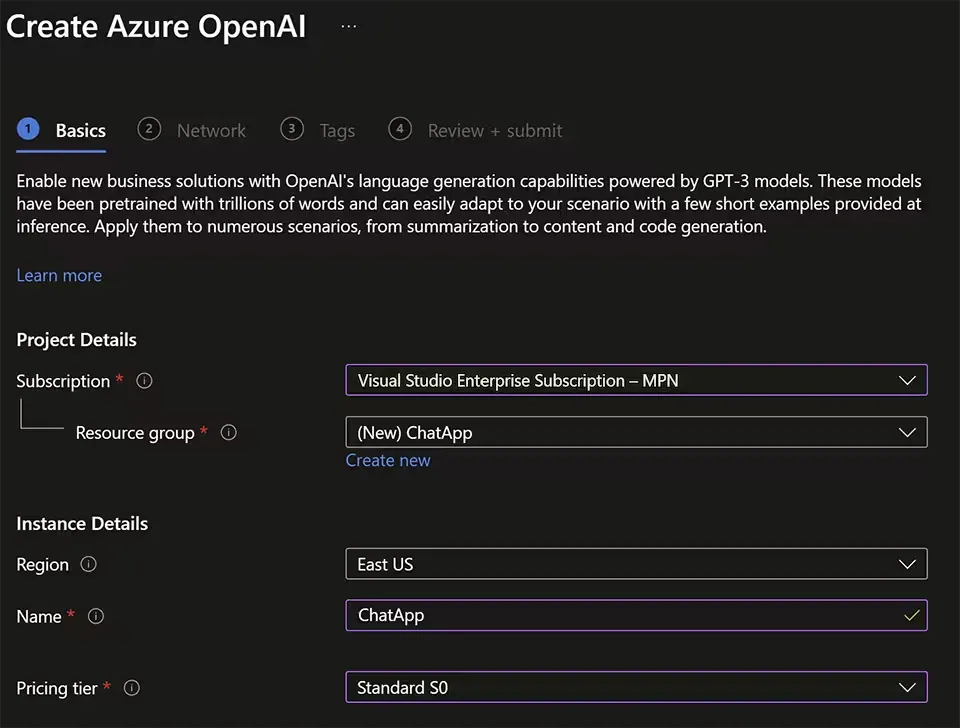
First, we provision an Azure OpenAI resource. This resource is required to use the Azure OpenAI APIs, including the OpenAI GPT-3 API. We’ll be using the Azure Portal for provisioning the resource, but you can also use the Azure CLI if you prefer.
Azure Portal

- We open the Azure portal at https://portal.azure.com (opens in a new window), and sign in using the Microsoft account associated with our Azure subscription.
- In the top search bar, we search for
Azure OpenAI, select Azure OpenAI, and create a resource with the following settings:- Subscription: The Azure subscription
- Resource group: We choose or create a resource group (e.g. ChatApp)
- Region: We choose any available region (e.g. East US)
- Name: We then enter a unique name (e.g. ChatApp)
- Pricing tier: Standard S0 (only one available)
- We select
Nextto go to Network page and make sure that the radio button forAll Networksis selected. - The
Review + createpage is our next goal. We review the settings, and then selectCreate. - The resource is created, and we can view it by selecting
Go to resource. - There we will open its Keys and Endpoint page. This page contains the information that we will need to connect to our resource and use it from our application. We will use the Key1 and Endpoint values in the next steps.
Copy the Key1 and Endpoint values into a new file named .env in the root of the project. The file should look like this:
# 📄.env
AZURE_OPENAI_ENDPOINT=https://{name}.openai.azure.com/
AZURE_OPENAI_KEY={key}Model Deployment
With the Azure OpenAI resource provisioned, we have access to the OpenAI studio, but no language model is deployed yet. We need to deploy a model to the resource to be able to use it in our application. We will deploy the GPT-3 model, which is a powerful language model that can generate human-like text. The GPT-3 model is available in different sizes, with the smallest being GPT-3.5-turbo. This model is fast and has good accuracy, making it a good choice for our chat application.
We’ll be using the Azure OpenAI Studio for deploying the model.

- We open the Azure OpenAI Studio either from the link of the deployed resource or directly at https://oai.azure.com/portal (opens in a new window).
- Inside the studio we navigate to the Deployments (opens in a new window) page using the entry on the left pane.
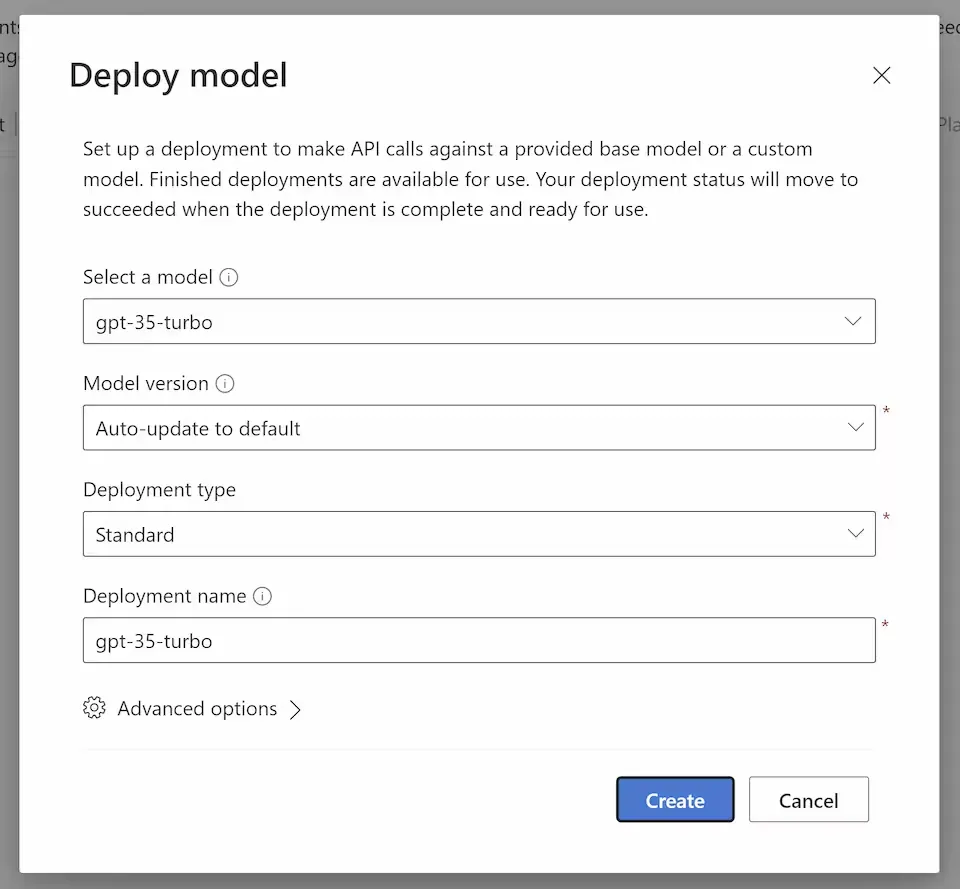
- Just above the (most likely empty) list of deployments, we select the Create new Deployment button.

- For our demo we select the gpt-35-turbo model for its speed and good accuracy. We enter a name e.g. ‘gpt-35-turbo’ and then click Create.
The deployment will take a few seconds to complete. Once it’s done, we can use the model in our application.
We copy the name of the deployment into the .env file:
# 📄.env
AZURE_OPENAI_ENDPOINT=https://{name}.openai.azure.com/
AZURE_OPENAI_KEY={key}
+ AZURE_OPENAI_GPT_NAME={model-name} #e.g. gpt-35-turbo
Backend Integration
We have finished all tasks we needed to perform on Azure, and can now integrate the Azure OpenAI resource with our backend API.
In Part 1 we installed the Semantic Kernel nuget package. Semantic Kernel is an SDK to build agents that can interact with (existing) code, do AI orchestration and can provide much more than just a simple chat integration. Though, for our purpose, it brings a simple way to interact with the Azure OpenAI API. You can read more on Semantic Kernel on the Microsoft Learn page (opens in a new window).
Chat Service
We create a new service in the backend project that will handle the communication with the Azure OpenAI resource.
Interface
We create a new file ChatService.cs and add the following code:
// 📄ChatService.cs
namespace ChatApi;

public interface IChatService
{
    public Task<string?> SendMessage(string message);
}
For convenience, we add the interface of the service in the same file as the service implementation. This is not a best practice, but it’s fine for this tutorial. In a real-world application, you would separate the interface and the implementation into different files.
Implementation
We can provide our model with a context to give it more information about the conversation and what we would expect the model to do or how to behave. The service also needs to know the endpoint and key of the Azure OpenAI resource and the name of the deployed model. We can pass these values to the service through the constructor.
Just below the interface, we start with adding the implementation of the service:
// 📄ChatService.cs
public class ChatService : IChatService
{
    private readonly ChatHistory _chatHistory;
    private readonly AzureOpenAIChatCompletionService _service;

    public ChatService(string deployment, string endpoint, string key)
    {
        _service = new AzureOpenAIChatCompletionService(deployment, endpoint, key);

        _chatHistory = new ChatHistory(
          """
          You are a nerdy Star Wars fan and really enjoy talking about the lore.
          You are upbeat and friendly.
          When being asked about characters or events, you will always provide a fun fact.
          """
        );
    }
}
We import the using statements as needed.
By passing a message to the ChatHistory constructor we are setting a SystemMessage on the history, which is used to tell the model how to behave and answer.
To finally implement the interface we add the SendMessage method:
// 📄ChatService.cs
public async Task<string?> SendMessage(string message)
{
    _chatHistory.AddUserMessage(message);
    var result = await _service.GetChatMessageContentAsync(
        _chatHistory,
        new OpenAIPromptExecutionSettings { MaxTokens = 400 }
    );

    return result.Content;
}
The message sent by the user is added as a UserMessage to the ChatHistory. We then call the GetChatMessageContentAsync method of the AzureOpenAIChatCompletionService to get the response from the model. We pass the ChatHistory and some settings to the method. The MaxTokens setting specifies the maximum number of tokens the model should generate.
We then return the answer to the caller.
Minimal API
In the Program.cs file, we need to register the ChatService as a singleton service and modify the /messages endpoint to use the service.
Just before running Builder.Build(), we add the following code:
// 📄Program.cs
builder.Services.AddSingleton<IChatService>(
  new ChatService(deployment, endpoint, key)
);
We are passing the deployment, endpoint, and key values from the configuration from Part 1 to the ChatService constructor.
What’s left is to modify the /messages endpoint to use the ChatService.
Replacing the existing code with the following:
// 📄Program.cs
app.MapPost("/messages", async (
  ChatMessage message,
  [FromServices] IChatService chatService
) =>
{
    if (message.Content == null)
        return Results.BadRequest("Content is required.");

    var result = await chatService.SendMessage(message.Content);
    return Results.Ok(result);
});
With the [FromServices] attribute, we inject the IChatService into the method. We then call the SendMessage method of the service with the message content and return the result. If the message content is null, we return a BadRequest result.
Testing the API
From an implementation perspective, we are done. We can now rebuild the docker image and run the docker-compose up command to run the backend API. With the API running we can test the /messages endpoint.
As in the first part, we can curl the endpoint or use a tool like Postman to send a POST request to it:
# 🖥️CLI
curl -X POST \
  --url 'http://localhost:8080/messages' \
  -H 'content-type: application/json' \
  -d '{
      "Content": "Who is Chewbacca?"
    }'

# Example of a possible output:
# Chewbacca is a Wookiee, best known as Han Solo's loyal
# co-pilot and friend. Fun fact: Chewbacca was played
# by Peter Mayhew, who was over 7 feet tall.
# His costume weighed around 50 pounds
# and was made of yak hair and mohair,
# giving him his iconic shaggy appearance.
In the next part, we will add a Vue.js frontend to the project and use Docker Compose to run both the API and the frontend together. Stay tuned!